背景

原生Centos7系统的yum源自带git版本是1.8.3.1。

这个版本诞生于:10-Jun-2013。

很多新特性都不支持,为了更好的使用git,我们需要进行版本升级。

源码编译安装

  1. 安装相关依赖
    1
    2
    # yum install curl-devel expat-devel gettext-devel openssl-devel zlib-devel asciidoc
    # yum install gcc perl-ExtUtils-MakeMaker
  2. 卸载当前git
    1
    # yum remove git
  3. 下载新版本源码包
    1
    2
    3
    4
    官方仓库地址:https://mirrors.edge.kernel.org/pub/software/scm/git/
    当前最新版本:git-2.28.0.tar.xz 27-Jul-2020

    # wget https://mirrors.edge.kernel.org/pub/software/scm/git/git-2.28.0.tar.xz
  4. 源码编译安装
    1
    2
    3
    4
    5
    6
    7
    8
    # tar -xvf git-2.28.0.tar.xz
    # cd git-2.28.0/
    # which openssl 获取本机openssl路径,当前机器/usr/bin/openssl
    # ./configure --with-openssl=/usr/bin/openssl
    # make prefix=/usr/local/git all
    # make prefix=/usr/local/git install
    # echo "export PATH=$PATH:/usr/local/git/bin" >> /etc/profile
    # source /etc/profile

Comment and share

系统软件环境

系统软件 版本
Jenkins 2.150.2
Slave Windows 10

问题描述

部分 Windows slave job 执行时间较长,日志分析发现不是Job脚本更新导致,而是因为Jenkins退出卡住。
日志分析:案例
具体任务在13:41就已经执行完成,但是Jenkins在13:51才退出返回结果。
也就是说整整卡住了10分钟,必须要解决。

原因分析

Jenkins 在 2.14 版本引入了 killSoftly 特性,出发点是想更加优雅的结束进程。
但是导致了 Windows slave上的 batch 脚本 执行完成 返回结果卡住(时间不确定)的情况。
Linux slave上的 shell 脚本执行退出没有发现此问题。

1
2
3
// Firstly try to kill the root process gracefully, then do a forcekill if it does not help (algorithm is described in JENKINS-17116)

killSoftly();

解决方法

可以通过 在Windows slave连接master机器的时候 增加 这个参数 -DSoftKillWaitSeconds=0 来解决。

1
2
3
# Run from agent command line:

java -Xrs -DSoftKillWaitSeconds=0 -jar agent.jar -jnlpUrl ...

使用上述命令重新连接 Master - Slave 后,可以在Slave系统信息界面看到参数生效了。
Slave信息

参考链接

https://issues.jenkins-ci.org/browse/JENKINS-55106
https://stackoverflow.com/questions/54039226/jenkins-hangs-between-build-and-post-build

Comment and share

参考链接:

背景:

搭建了Openldap维护公司域账户信息,Gerrit用户验证接入了LDAP。
gerrit.config配置如下(信息请更新为各自公司节点):

1
2
3
4
5
[ldap]
server = ldap://ldap.example.com
username = ldapuser
accountBase = ou=people,dc=example,dc=com
groupBase = ou=groups,dc=example,dc=com

业务需求:

公司特定合作伙伴 有 访问代码库 进行 联合开发的需求。

方案设计:

  1. 在现有LDAP节点的基础上,增加一个ou(custom),用来维护合作伙伴账号;
  2. 同步 这个ou(custom)的人员到Gerrit上。

配置Gerrit支持多ou user信息:

根据Gerrit官方文档:

1
2
3
ldap.accountBase
Root of the tree containing all user accounts. This is typically of the form ou=people,dc=example,dc=com.
This setting may be added multiple times to specify more than one root.

我们调整gerrit.config配置如下:

1
2
3
4
5
6
[ldap]
server = ldap://ldap.example.com
username = ldapuser
accountBase = ou=people,dc=example,dc=com
accountBase = ou=custom,dc=example,dc=com
groupBase = ou=groups,dc=example,dc=com

然后重启Gerrit后,custom里面的人员也可以登录Gerrit了。


配置Gerrit支持多group信息:

方法和上面同步多个ou user信息相似,增加ldap.groupBase行即可。
根据Gerrit官方文档:

1
2
3
ldap.groupBase
Root of the tree containing all group objects. This is typically of the form ou=groups,dc=example,dc=com.
This setting may be added multiple times to specify more than one root.

关于LDAP group信息:

一般系统接入LDAP做账户验证,只需同步LDAP的user信息,不直接使用LDAP的group信息。
各个系统自行创建系统组进行人员权限管理,这样更加灵活。
同时,也不建议LDAP里面维护太多group,更加推荐LDAP轻量化使用。

Comment and share

Git tips two

in SCM

软件版本:

1
git version 2.23.0

使用http/https协议代码库地址,有时会出现不能存储密码,每次交互操作都需要输入帐户密码情况:

1
2
3
记住密码(默认15分钟):git config --global credential.helper cache
自己定义时间(一小时后失效):git config credential.helper 'cache --timeout=3600'
永久存储密码:git config --global credential.helper store

行结束符处理:

OS Line Endings Comments
Windows CRLF 每行结尾是 <换行><回车 > ,即 \n\r
Mac OS X LF 每行结尾只有 <换行> ,即 \n
Unix/Linux LF 每行结尾只有 <换行> ,即 \n
Classic macOS CR 每行结尾是 <回车>,即 \r
1
2
3
4
5
6
7
8
9
10
11
排除老Mac系统不讨论,项目组如果不是全Windows环境开发/部署的话,还是要自动处理下行结束符。

# Windows用户执行下面配置命令:
$ git config --global core.autocrlf true # 在提交时自动地把行结束符CRLF转换成LF,而在签出代码时把LF转换成CRLF

# Linux 和 Mac用户执行下面配置命令:(预防代码库已经有CRLF结束符的代码)
$ git config --global core.autocrlf input # 在提交时把CRLF转换成LF,签出时不转换

# 默认配置:
$ git config --global core.autocrlf false # 提交和签出时都不对代码行结束符做转换

Comment and share

参考链接:


场景1:

最新的一个提交版本里面新增了敏感、较大、无意义的文件,需要进行清理。
1
2
3
4
5
6
7
8
9
10
11
1. 删除文件
$ git rm --cached ${文件绝对地址}
2. 增加到上述文件到 .gitignore
$ vim .gitignore
3. 修复最新提交版本
$ git commit --amend
4. 推送新版本到远端仓库
如果刚才版本已经推送到远端仓库:
$ git push -f
如果刚才版本只是在本地仓库:
$ git push

场景2:

历史版本里面存在敏感、较大、无意义的文件,需要进行清理。

使用 git filter-branch

git 原生提供的命令,如果没有的话,请先升级机器git版本。

  • 原理:
    扫描代码库所有版本
    如果某个版本里面发现了指定的文件OR目录:
    如果此版本包含要清理的文件OR目录 和 其它变更的话,对此版本进行删除指定文件OR目录(保留其它变更),并生成新的版本。同时后面的版本会变基到新版本。
    如果此版本只包含要清理的文件OR目录变更的话,那么此版本会被清除。同时后面的版本会变基到上一个版本。
    如果版本没有包含指定文件OR目录,那么继续遍历。
  • PS:
    1. 如果代码库历史比较多 OR 涉及到指定文件OR目录的版本比较多,那么命令执行会比较慢。
    2. 一般会导致代码库版本树变化,对于涉及开发同学,建议开始前提交本地修改变更到远端仓库,完成后本机重新clone代码库进行开发。
    3. 一般都在本地仓库根目录执行
    4. 执行命令后历史版本里面已经清理了文件, 但是我们的本地仓库里面仍然保留了这些objects, 等待垃圾回收(GC), 如果想立即回收本地仓库空间可以执行 git gc –prune=now.
1
2
3
4
5
6
7
8
9
10
1. 执行命令
$ git filter-branch --force --index-filter 'git rm --cached -r --ignore-unmatch ${要清理的文件OR目录的绝对地址}' --prune-empty --tag-name-filter cat -- --all
2. 增加到上述文件OR目录到 .gitignore
$ vim .gitignore
3. 推送新版本到远端仓库
$ git push -f --all
$ git push -f --tags
4. 清理本地仓库残留的git objects
$ git reflog expire --expire=now --all
$ git gc --prune=now

使用 bfg-repo-cleaner

Roberto Tyley使用Scala语言写了 bfg-repo-cleaner工具。
可以简单理解为一个轻量级的 git filter-branch。
使用比较简单,功能比较强大,只需要下载最新的jar包,然后执行👇命令:

1
2
3
4
# 删除大于50M的文件
$ java -jar bfg.jar --no-blob-protection --strip-blobs-bigger-than 50M
# 删除指定文件
$ java -jar bfg.jar --no-blob-protection --delete-files ${要清理的文件的绝对地址}

PS:
1. bfg-repo-cleaner 有个protect功能,默认HEAD是受保护的。
受保护的分支最新版本如果涉及需要清理文件,那么并不会成功。
–no-blob-protection 关闭protect功能
–protect-blobs-from ${分支1},${分支2} 增加受保护的分支
2. 建议在本地仓库根目录执行。


场景3:

查找代码库里面较大文件方法:
- 如果当前版本还存在的文件,可以直接du排序来识别;
- 如果当前版本不存在,但是历史中出现过的大文件,可以按照下面步骤来查询。

1
2
1. 显示比较大的pack
$ du -ah .git/objects/pack

logo

1
2
2. 识别object,对输出的第三列信息即文件大小进行排序
$ git verify-pack -v .git/objects/pack/${pack-XXX.pack} | sort -k 3 -n | tail -5

logo

1
2
3. 识别object对应的文件
$ git rev-list --objects --all | grep ${👆获取的object}

logo

Comment and share

参考链接:

背景:

随着公司前端团队的扩大,需要拆分出公司基础模块供其它项目使用,使用Nexus3搭建公司npm私服。

搭建步骤:

1. 创建npm库:

logo
logo
logo
logo

2. 权限配置:

  • 激活 npm Bearer Token Realm
    logo
  • 创建开发权限组对hosted npm私服库读写权限
    logo
    logo
  • 创建dev帐户并加入到开发权限组
    logo
    logo
1
PS: 匿名用户可以下载私服npm包,只有dev组内的帐户才能publish包到hosted私服

使用:

1.配置nexus私服

  • 查看本机私服配置:
    1
    $ npm config get registry
  • 设置本机配置到group私服:
    1
    2
    $ npm config set registry http://${ip}:8081/repository/${npm_group}/
    (写入到本机.npmrc文件)
  • 此时,项目执行npm install即从nexus上面进行下载包

2.配置publish帐户

有👇两种方式

  • Authentication Using Realm and Login
    1
    2
    3
    4
    5
    6
    7
    8
    9
     $ npm login --registry=http://${ip}:8081/repository/${npm_hosted}/


    Username: dev (各位根据上面创建的帐户自行替换)
    Password: ${dev_pass} (各位根据上面创建的密码自行替换)
    Email: (this IS public) XXX@XXX.com (各位根据上面创建的邮箱自行替换)

    Logged in as dev on http://${ip}:8081/repository/${npm_hosted}/.
    (写入到本机.npmrc文件)
  • Authentication Using Basic Auth
    1
    2
    3
    4
    5
    6
    7
    8
    9
     $ echo -n 'dev:${dev_pass}' | openssl base64  (dev帐户密码base64编码)


    本机.npmrc文件里面增加👇行

    email=XXX@XXX.com
    always-auth=true
    _auth=${base64编码后的值}

3.推送npm包到nexus

有👇两种方式

  • 命令行 + 发布路径

    1
    $ npm publish –registry http://${ip}:8081/repository/${npm_hosted}
  • package.json配置发布路径(推荐)

    1
    2
    3
    4
    5
    6
    7
    8
    9
    项目package.json增加👇配置:

    "publishConfig" : {
    "registry" : "http://${ip}:8081/repository/${npm_hosted}/"
    },


    执行👇命令即可
    $ npm publish

Comment and share

localRepository机制:

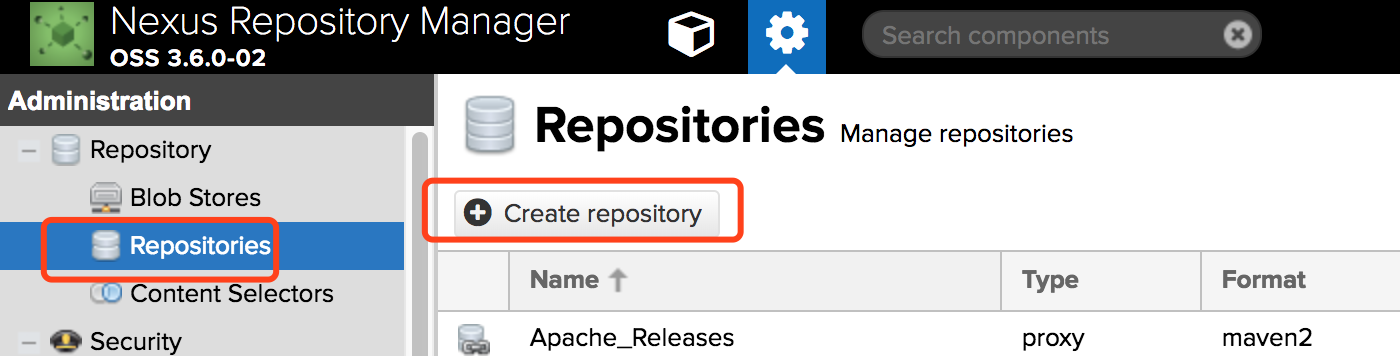
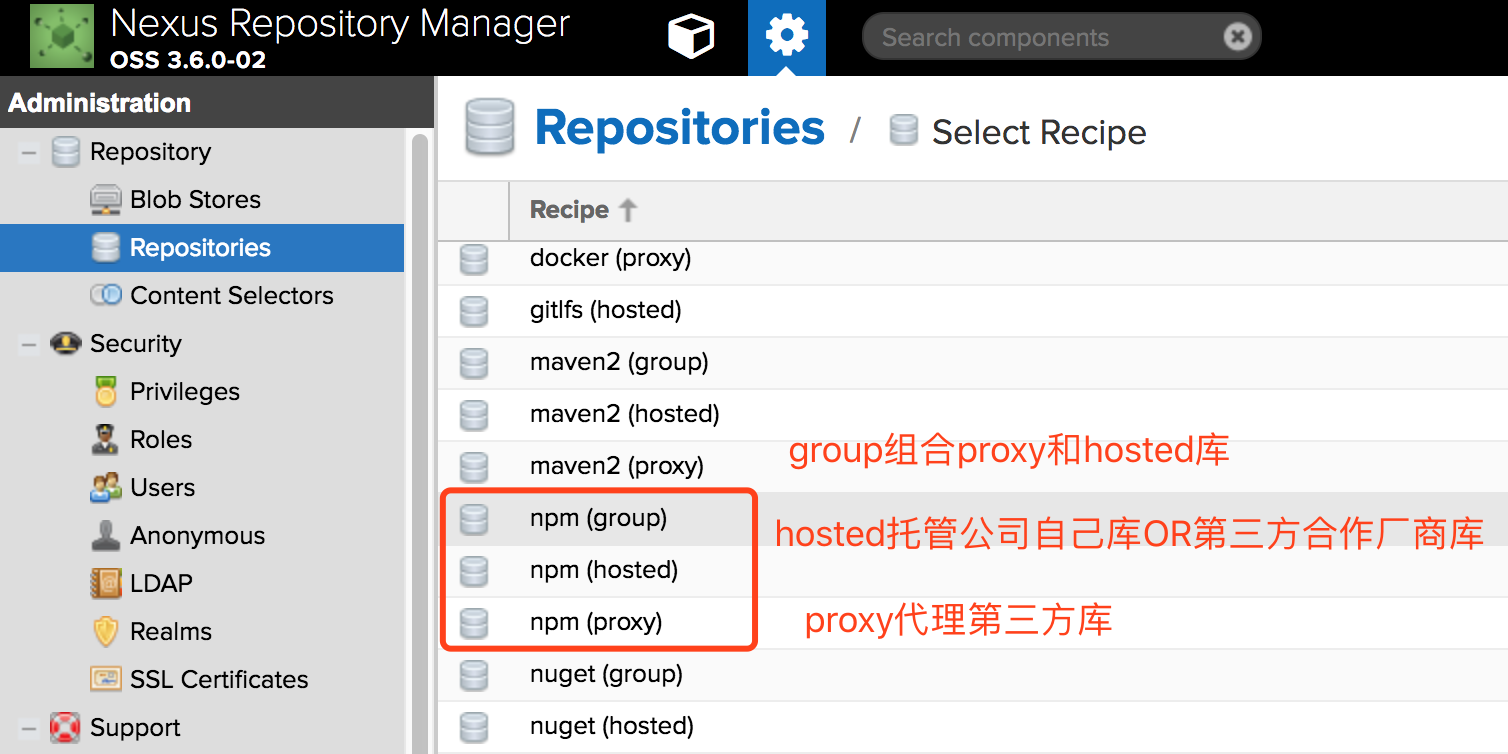
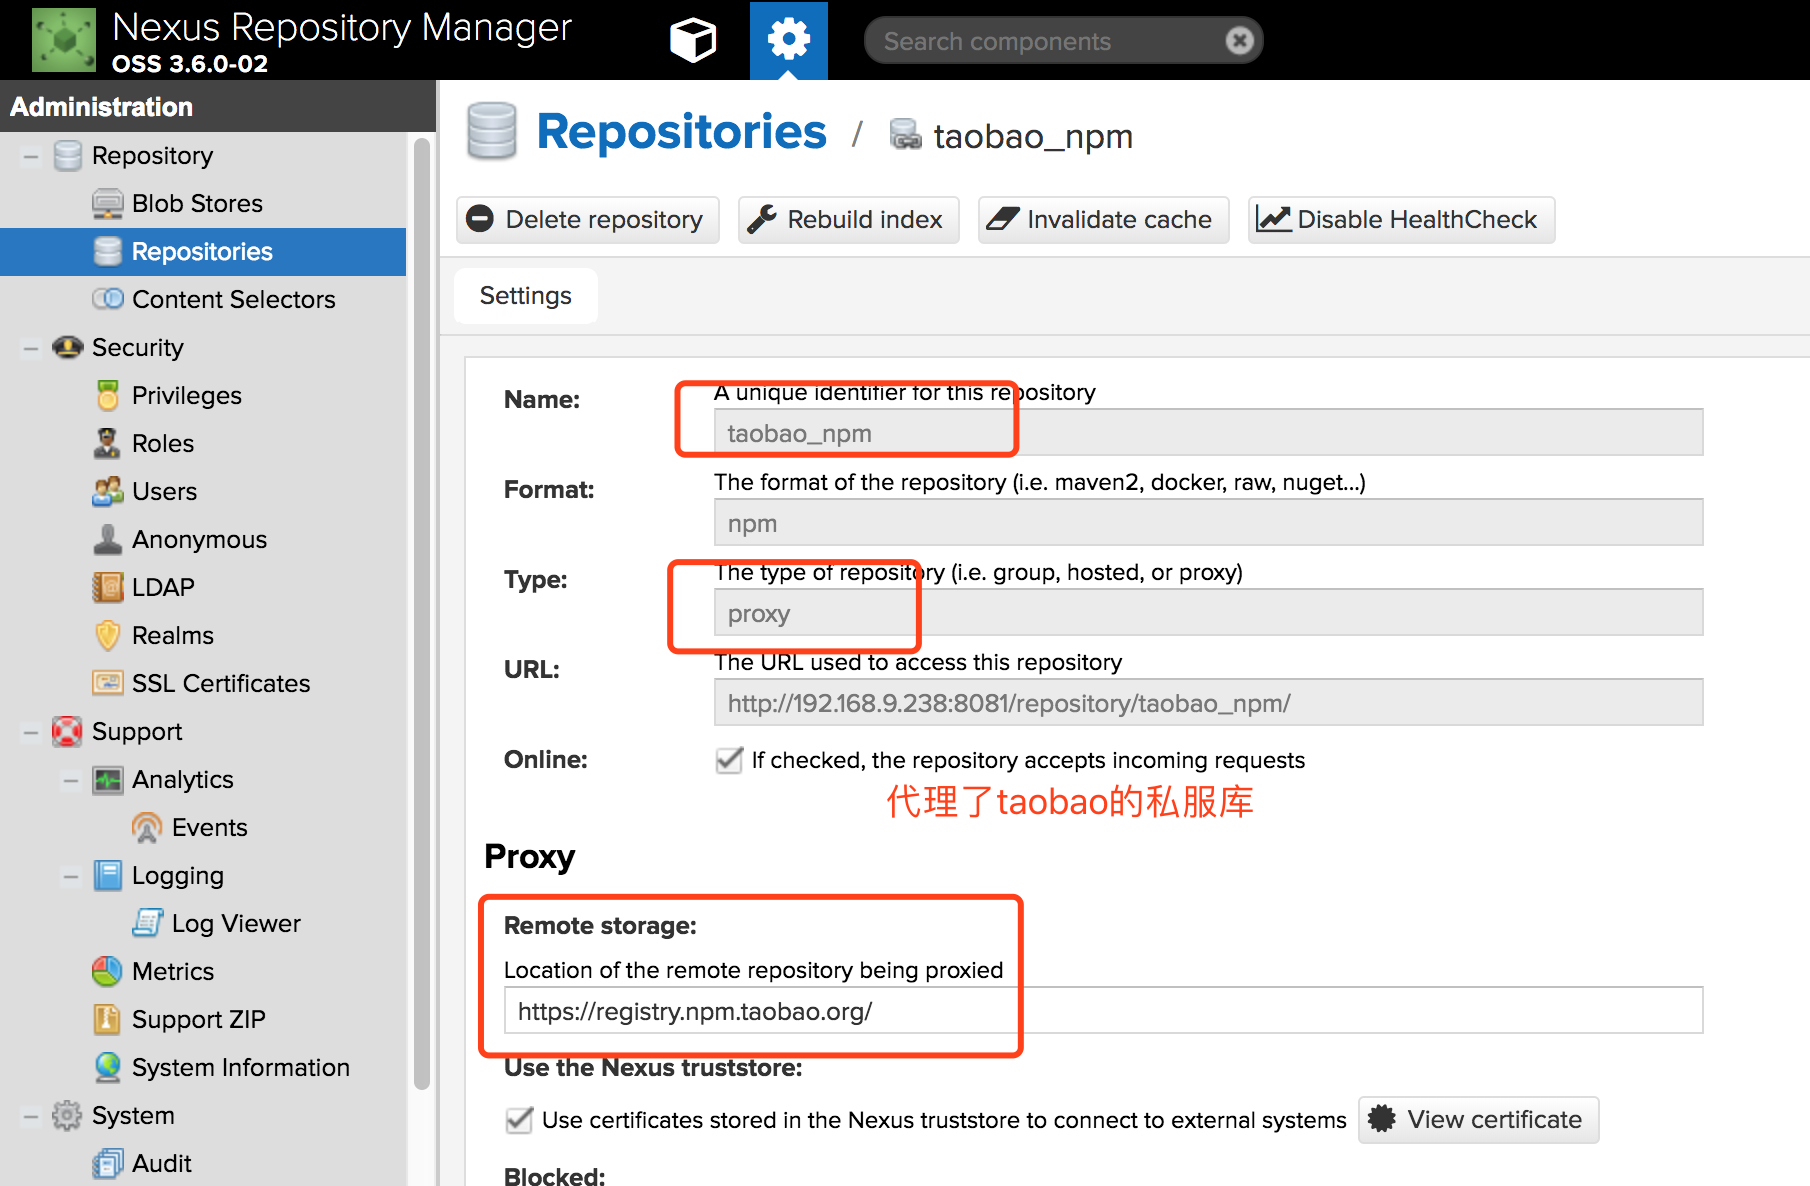
  • introduction-to-repositories
    The local repository refers to a copy on your own installation that is a cache of the remote downloads, and also contains the temporary build artifacts that you have not yet released.

  • settings.xml配置:

    /path/to/local/repo

  • 使用场景:

    • maven执行编译打包时先进行依赖的下载:
    • 如果项目依赖localRepository中已经存在,那么继续进行编译打包;
    • 如果项目依赖localRepository中不存在,那么先下载依赖到localRepository,然后进行编译打包;

强制更新SNAPSHOT版本依赖:

  • snapshots updatePolicy
    • updatePolicy: This element specifies how often updates should attempt to occur. Maven will compare the local POM’s timestamp (stored in a repository’s maven-metadata file) to the remote. The choices are: always, daily (default), interval:X (where X is an integer in minutes) or never.
  • 👇场景下需要强制更新:
    • 默认snapshot版本依赖localRepository更新是天级的。如果项目联调阶段一天之内多次snapshot依赖更新。

    • 如果项目下载依赖过程中断(常见网络原因),导致localRepository中的文件状态有问题。

      mvn clean package -U

      -U,–update-snapshots
      Forces a check for missing releases and updated snapshots on remote repositories

强制更新RELEASE和SNAPSHOT版本依赖:

  • 👇场景建议使用强制更新:

    • 如果项目下载依赖过程中断(常见网络原因),导致localRepository中的文件状态有问题。
  • 方法:

    • 简单粗暴型:直接清空localRepository,然后执行编译打包重新下载依赖。

    • 推荐精细型:定向删除localRepository中 本次项目涉及依赖,然后重新下载:

      mvn dependency:purge-local-repository

        tells Maven to clear all dependency-artifact files out of the local repository, and optionally re-resolve them.
      

Comment and share

参考链接:

背景:

已经搭建Nexus3.6.0,需要迁移原有 两个 nexus2上的jar包 到nexus3统一管理。

分析:

  • Nexus2.x 服务器直接存储jar包
  • Nexus3.x 服务器存储的是二进制文件
  • 所以不能通过 copy原Nexus2.x服务器上的 repositories目录 到nexus3.X,刷新index方式来迁移。

迁移导入方法:

  1. 官方Upgrading
    具体实施可以参考上一篇blog。
    这种方法有两个小问题:
    - 需要原nexus版本为2.14.x版本
    - 每个nexus2导入都会在nexus3上面都会创建一个仓库,不适合有多个nexus2统一迁移到一个nexus3

  2. mvn deploy命令上传
    如果原nexus2待迁移的jar包并不多,可以使用这种方式。
    1. 只上传jar,自动生成pom.xml (独立jar,pom不需要依赖其它)
    mvn deploy:deploy-file -DgroupId=$groupId -DartifactId=$artifactId -Dversion=$version -Dpackaging=jar -DrepositoryId=nexus -Durl=http://$ip:8081/repository/$repository_name -Dfile=$path/XX.jar

    2. 上传jar 和 pom.xml (pom里面有依赖)
    mvn deploy:deploy-file -DgroupId=$groupId -DartifactId=$artifactId -Dversion=$version -DgeneratePom=false -Dpackaging=jar -DrepositoryId=nexus -Durl=http://$ip:8081/repository/$repository_name -DpomFile=$path/pom.xml -Dfile=$path/XX.jar
    需要注意:
    - 命令里面-DrepositoryId=nexus对应的是本机mvn settings.xml文件配置
    - 写脚本封装上面命令实现批量迁移

  3. http协议上传
    直接使用http put 文件到/repository/$repo-id/$path-of-file
    curl -v -u admin:admin123 –upload-file pom.xml http://$ip:8081/repository/maven-releases/org/foo/1.0/foo-1.0.pom
    我们需要上传的文件:jar和pom.xml

    创建 mavenimport.sh 脚本如下

1
2
3
4
5
6
7
8
9
10
11
12
13
14
15
#!/bin/bash

# Get command line params
while getopts ":r:u:p:" opt; do
case $opt in
r) REPO_URL="$OPTARG"
;;
u) USERNAME="$OPTARG"
;;
p) PASSWORD="$OPTARG"
;;
esac
done

find . -type f -not -path '*/\.*' -not -path '*/\^archetype\-catalog\.xml*' -not -path '*/\^maven\-metadata\-local*\.xml' -not -path '*/\^maven\-metadata\-deployment*\.xml' -exec curl -u $USERNAME:$PASSWORD -X PUT -v -T {} $REPO_URL{} \;
登陆到Nexus2.x服务器执行
    cd $releases_dir
    cp $path/mavenimport.sh .
    sh mavenimport.sh -u admin -p admin123 -r http://$ip:8081/repository/$release_repository_name

    cd $snapshots_dir
    cp $path/mavenimport.sh .
    sh mavenimport.sh -u admin -p admin123 -r http://$ip:8081/repository/$snapshots_repository_name

需要注意:
    - 上面命令里面 -u admin -p admin123 请更换成nexus管理员帐户密码 (nexus默认管理员/密码 admin/admin123)
    - 上面命令里面 $releases_dir 是指Nexus2.x服务器上存储releases仓库路径。
    - 上面命令里面 $snapshots_dir 是指Nexus2.x服务器上存储snapshots仓库路径。
    - 如果不切换到上面目录里面,那么上传的jar包 group_id会有问题。

Comment and share

背景:

公司主要使用git作为代码管理仓库,现需要把部分使用svn管理的代码迁移到git。

需求:

需要保留所有 branches、主干、tags的历史记录。

迁移方法:

使用git官方提供的git svn命令

系统环境:

  • OS: macOS 10.13.3
  • SVN:1.9.4
  • GIT:2.16.2

迁移步骤:

  1. 获取指定svn代码库涉及的开发同学名单并转换:
    svn log $SVN_URL –xml | grep author | sort -u | perl -pe ‘s/.>(.?)<.*/$1 = /‘ > user.txt

user.txt内容如下:
dev1_name =
dev2_name =
因为svn只有用户名,而git需要提供用户名和邮箱,所以我们需要做下用户转换。
修改上述命令得到的user.txt如下:
dev1_name = dev1_name
dev2_name = dev2_name
2. 使用git svn cloned代码库到本地:
git svn clone $SVN_URL –no-metadata –authors-file=user.txt -s
3. 调整本地库目录结构:
cd $project_dir
mv .git/refs/remotes/origin/tags/$tags_name .git/refs/tags/
mv .git/refs/remotes/origin/$branches_name .git/refs/heads/
rm -rf .git/refs/remotes/origin
4. 上传本地库到remote仓库:
git remote add origin $GIT_URL
git push origin –all
git push origin –tags

PS:

  1. 如果svn历史记录太多,而且并不需要很久之前的版本的话,可以选择从指定版本进行转换。
    git svn clone $SVN_URL -r $指定版本:HEAD
  2. 较新版本的git都原生带了 git svn命令,如果你使用的git版本没有此命令,建议升级新版git或者单独安装git-svn命令。
  3. git clone命令执行时间主要和 原SVN库大小、log多少有关。
  4. svn迁移git后需要注意git不支持空目录,需要使用在空目录增加隐藏文件来上传,通常使用.gitkeep文件。
  5. 如果原SVN库结构不是规范的branches、tags、trunk结构
    git svn clone $SVN_URL –branches= –tags= –trunk=
    如果没有tags的话–tags可以不写,branches同理;subdir写相对路径即可
    上面使用的-s参数表示的是–stdlayout适合标准结构的SVN项目。

Comment and share

背景

公司拆分子公司,需要把现有Gitlab也分离出来。

搭建环境:

  • centos6.5
  • gitlab8.8.5

搭建方法:

  • Omnibus package installation

遇到问题:

安装完成,执行 #gitlab-ctl reconfigure 报错如下:

1
2
3
4
5
6
7
8
9
10
11
12
13
14
15
[execute] /opt/gitlab/embedded/bin/psql: symbol lookup error: /opt/gitlab/embedded/bin/psql: undefined symbol: PQconnectdbParams
[execute] /opt/gitlab/embedded/bin/psql: symbol lookup error: /opt/gitlab/embedded/bin/psql: undefined symbol: PQconnectdbParams

================================================================================
Error executing action `run` on resource 'execute[create gitlab database user]'
================================================================================

Mixlib::ShellOut::ShellCommandFailed
------------------------------------
Expected process to exit with [0], but received '127'
---- Begin output of /opt/gitlab/embedded/bin/psql --port 5432 -h /var/opt/gitlab/postgresql -d template1 -c "CREATE USER gitlab" ----
STDOUT:
STDERR: /opt/gitlab/embedded/bin/psql: symbol lookup error: /opt/gitlab/embedded/bin/psql: undefined symbol: PQconnectdbParams
---- End output of /opt/gitlab/embedded/bin/psql --port 5432 -h /var/opt/gitlab/postgresql -d template1 -c "CREATE USER gitlab" ----
Ran /opt/gitlab/embedded/bin/psql --port 5432 -h /var/opt/gitlab/postgresql -d template1 -c "CREATE USER gitlab" returned 127

问题分析:

因为我的centos服务器上面已经装了postgresql的8.4.18版本;

1
2
3
4
[root@gitlab0 ~]# rpm -qa|grep postgres
postgresql-8.4.18-1.el6_4.x86_64
postgresql-devel-8.4.18-1.el6_4.x86_64
postgresql-libs-8.4.18-1.el6_4.x86_64

使用/opt/gitlab/embedded/bin/psql的时候找不到对应的库(/opt/gitlab/embedded/lib/postgresql)。

解决方法1:

卸载postgresql-8.4.18,卸载gitlab,然后重新安装gitlab。

卸载gitlab方法如下:

1
2
3
4
sudo gitlab-ctl stop
sudo gitlab-ctl uninstall
sudo gitlab-ctl cleanse
sudo rm -rf /opt/gitlab

解决方法2:

增加gitlab带的psql所需lib路径到系统LD_LIBRARY_PATH

1
2
3
4
5
6
7
8
9
# vi /etc/profile

export LD_LIBRARY_PATH=/opt/gitlab/embedded/lib:/tmp/product.......

# source /etc/profile

# echo $LD_LIBRARY_PATH

/opt/gitlab/embedded/lib:/tmp/product.......

PS:

  1. 增加/opt/gitlab/embedded/lib路径到$LD_LIBRARY_PATH最前面,因为是按顺序加载路径,所以如果加到最后面还是不能成功。
  2. 路径之间使用:分隔

然后再执行#gitlab-ctl reconfigure,即可成功。

1
gitlab Reconfigured!

查看postgresql版本:

1
2
3
4
[root@gitlab0 ~]# /opt/gitlab/embedded/bin/psql --version
psql (PostgreSQL) 9.2.16
[root@gitlab0 ~]# psql --version
psql (PostgreSQL) 8.4.18

参考链接:

http://dreamlikes.cn/archives/78

Comment and share

Author's picture

Weilong

    Write something about work-life:

PM


Shenzhen